Thursday, March 25, 2010

Bayou Brownies!!

Hey! We are almost to a weekend. I can feel it and I am hoping that means I can have another movie night with my fam. That is where the inspiration for these brownies came from. We watched Disney's "Princess and the Frog" and just loved it. Well, we needed a treat to go along so this is what we came up with. Enjoy and let me know what you think!!!!

So first make the batter for your very favorite brownie (a mix is fine too.) Now before you bake it break up Oreo cookies in big pieces and press them into the batter. Then bake as directed. The brownie and the Oreo's are supposed to be the bog and the dirt. Once your cookies have cooled cover them in fudge. I made mine from scratch, but you can buy some pre-made(just like ice cream hot fudge). Just make sure it is nice and thick (no need to heat it up). Pour this all over your brownies and smooth flat. This is the mud.

Next comes the mint frosting (the frog). Tint a vanilla frosting your favorite shade of green and add some peppermint extract. Spread this evenly over the mud layer. Now you are ready for the princess part. I topped mine with a jimmy sprinkle that is pearlized so it is shiny and sparkles. You could also use a sanding sugar to get some sparkle. To finish them off all you need is the kiss! So I finished my brownies with Hershey's mini baking kisses. I had WAAAAY to much fun making these!

So, I bought these shoes a few weeks ago and didn't care that I had no where to wear them. They are gold and sparkle and I had to have them. Well I wore them while I made these and definitely felt like a princess!! Have Fun!!!


Monday, March 22, 2010

Ka-Chow!

Happy Monday! Well, I was busy this weekend with a birthday cake and here is how it turned out. It was the first time I have ever sculpted characters, but it being for a family member I figured it was a good time to practice. What do you think? I was just happy everyone recognized who they were and that the birthday boy was happy!!


Thursday, March 18, 2010

Disney!

Hey all! So last week I was at the happiest place on earth, Disneyland!! I was so excited when I walked through Mickey's house and found a cake. It was stashed with a bunch of other random things so it must have been food storage. I like the way you think Mickey!! Check back soon, I have some fun things coming!

Sunday, March 14, 2010

St. Patties Kids Cupcakes

So, here is another idea for this weeks St. Patricks day. This one is a definite winner with kids, not only to eat, but also to help make.
So here are some basics you will need for this recipe. I used a yellow cake for the "gold", but feel free to use another flavor if you like. Also you will need pretzels and green Wilton candy melts. You can find these at Micheals craft or Orson Gygi. (Tip: Don't try to color white chocolate unless you have special oil chocolate coloring. Regular food coloring has water in it that will separate your chocolate and make it nasty.)

So bake your cupcakes like the directions say and get them in the oven. While they are baking get started on your chocolate pretzel clovers. I melt my chocolate in a microwave safe bowl about 30 seconds at a time at half power so it doesn't burn. White chocolate can burn easily so make sure to do it slowly stirring a lot or on a double boiler. Next just throw in your pretzels, coat them thoroughly and shake off the extra chocolate.


Once covered in chocolate I layed mine out on a piece of tinfoil. Make sure you have three pretzels for each cupcake (and a few extra in case one breaks or you need a snack). Also I broke up the pretzels to make a stem for each clover. They dry pretty quickly, so once you get the cupcakes out of the oven and cooled you should be ready to go.


Frost with your favorite frosting (in this case cream cheese) and place your pretzels on top. Anyone who gets to eat one of these is for sure lucky!!!


Friday, March 5, 2010

Jackpot!!!

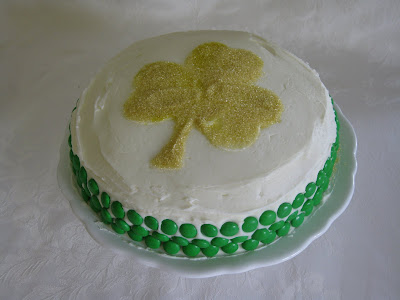
So I thought I would make a cake that would include recognizable colors and symbols that were associated with St. Patrick's Day. I came up with this cute and simple little cake. We have the colors green and gold and also a clover that match so well with the holiday. Wait, isn't their one more thing that we associate with this holiday? How about a ...
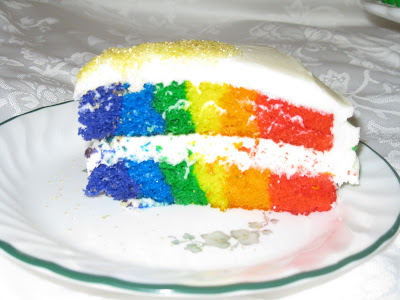

RAINBOW!!!! Ok, you might have been thinking Leprechaun, but I didn't know how to catch one of those, let alone stick it in a cake so this is the next best thing! I have to say this was WAY fun to make and it is such a surprise when you cut into it. Check out the process and then give it a try for some LUCKY person in your life. Happy baking and be sure to tell me how it turned out!!
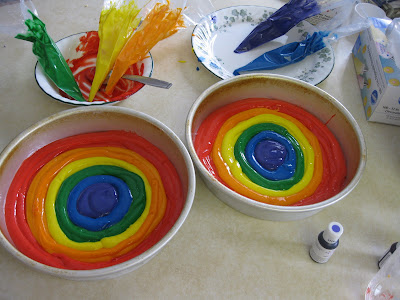
Here we are with the cakes before they were baked. I colored the batter with Americolor for a very dramatic look, but Wilton gel colors would also work too. Once the batter was colored I used piping bags to put it in the pans. I started on the outside with red and worked my way in. One tip: I did one layer of each color and then went back and did another layer on top of the last in the same color. If you tried to make it thick to begin with you wouldn't have enough room for all your colors because they would run into the middle. Into the oven!!


Once they were baked and cooled I stacked them with a layer of my favorite cream cheese frosting and prepared to decorate the side.
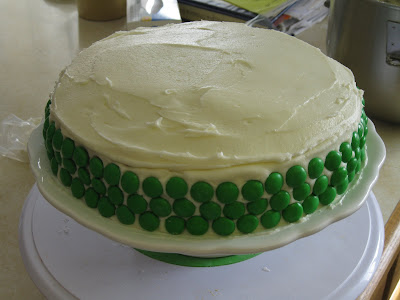


Frost the edge with a nice (but not too heavy, or it will droop) layer of frosting and then work your way around the cake placing M&M's. I always put the M on the inside so it is just the plain color you see. You may think this will take forever, but believe me it looks awesome and goes fast. Especially if you recruit some helpers. As long as they don't eat all your M&M's!
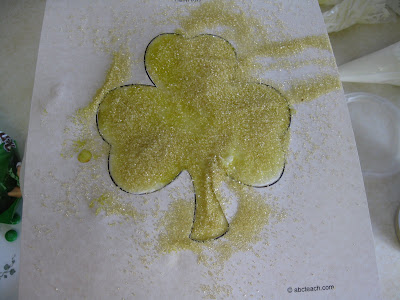


I printed this big shamrock off the Internet on a piece of card stock and cut it out. While I was doing this my frosting got a crust on it, which you want. I placed the paper on the cake and gently pressed all around the edges so it sunk into the frosting a little. Then I very lightly wet the shamrock frosting with just a little water on my fingers. Next I dumped on a ton on gold sanding sugar and this is what it looked like.
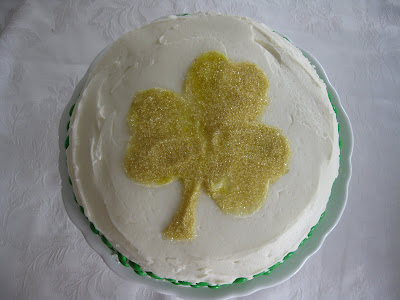


After that you can either dust off the excess sugars or just lift off the paper carefully. This was my end result. Sparkly and tasty!!
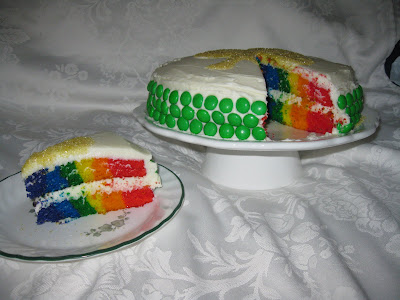


Then all you have to do is dig in and watch everyone's surprised and excited faces!! YUM!